Propagating roses from cuttings is a satisfying way to expand your garden with minimal cost. This unique method of using toilet paper offers an accessible, eco-friendly approach that helps retain moisture while fostering root development. Here’s an in-depth guide with detailed steps and tips for successful propagation.
Materials Needed
- Healthy Rose Cuttings
- Select healthy stems approximately the thickness of a pencil, taken from mature rose plants.
- Ideal times for cutting:
- Dormant Season (Late Winter): Best for hardwood cuttings.
- Early Spring or Summer: Softwood cuttings can also root successfully but require more care to prevent drying out.
- Toilet Paper
- Use regular, unbleached toilet paper. This acts as a moisture-retaining wrap around the cutting.
- Rooting Hormone
- Choose powdered or gel rooting hormones available at gardening centers. These help stimulate root development and improve success rates.
- Plastic Ziplock Bags
- Transparent sandwich-sized bags to create a humid mini-greenhouse environment for the cuttings.
- Garden Shears
- Use sharp, sterilized shears to make clean cuts. Dull or dirty tools can damage the plant and increase the risk of infection.
- Planting Pots
- Use small pots (3–6 inches in diameter) with well-draining potting soil to pot the cuttings once roots form.
- Watering Can or Spray Bottle
- A spray bottle is especially helpful for gently misting the cuttings to avoid overwatering.
Detailed Step-by-Step Guide
1. Selecting and Preparing Rose Cuttings
- Select a Healthy Parent Plant:
Choose a disease-free, mature rose bush with strong, straight stems. - Cut the Stems:
- Make a 6–8-inch cut at a 45° angle, just below a node (a swollen part of the stem where leaves or buds grow).
- Ensure there are at least 3–5 nodes on the cutting.
- Remove Leaves and Thorns:
- Strip the leaves and thorns from the lower half of the cutting to focus energy on root growth.
- Leave 2–3 healthy leaves at the top to aid photosynthesis.
2. Treating the Cuttings
- Callus Formation:
- Allow the freshly cut stems to air dry for an hour to form a callus. This helps prevent rotting when they are placed in water or wrapped in moist paper.
- Apply Rooting Hormone:
- Dip the cut end into the rooting hormone, ensuring the bottom 1–2 inches are well-coated. Tap off excess powder or gel.
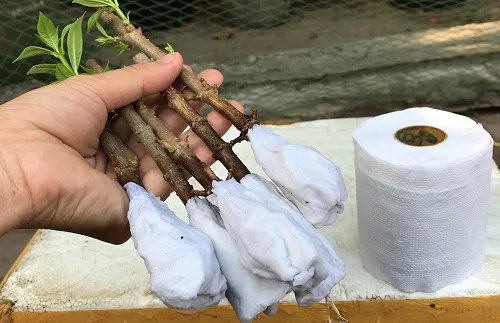
3. Wrapping in Toilet Paper
- Prepare the Wrap:
- Tear off a sheet of toilet paper and fold it to make a strip that is 2–3 inches wide.
- Moisten the strip lightly; it should be damp but not dripping.
- Wrap the Cutting:
- Wrap the moist toilet paper snugly around the lower portion of the cutting, focusing on the area coated with rooting hormone.
- Secure with a small rubber band if needed to keep the wrap in place.
4. Creating a Humid Environment
- Place in a Plastic Bag:
- Insert the wrapped cutting into a plastic ziplock bag, ensuring the paper stays damp.
- Partially seal the bag, leaving a small gap for airflow.
- Mist the Cutting:
- Use a spray bottle to lightly mist the inside of the bag. The goal is to maintain a humid but not overly wet environment.
5. Caring for the Cuttings
- Positioning:
- Place the bags in a bright, warm location with indirect sunlight. Avoid direct sunlight to prevent overheating.
- Aim for consistent temperatures of 65–75°F.
- Monitor Moisture:
- Check the toilet paper every few days to ensure it remains damp. Mist as needed to maintain humidity.
- Inspect for Roots:
- After 4–6 weeks, gently tug on the cutting. Resistance indicates root formation.
Transplanting the Rooted Cuttings
- Prepare Pots:
- Use small pots filled with well-draining potting soil. Moisten the soil lightly before planting.
- Plant the Cuttings:
- Carefully remove the cutting from the plastic bag and unwrap the toilet paper.
- Plant the cutting about 2–3 inches deep, ensuring the roots are completely covered.
- Water Gently:
- Use a spray bottle or watering can to keep the soil moist but not waterlogged.
- Gradual Acclimation:
- Place the potted cuttings in a shaded area outdoors to harden them off. Gradually increase sun exposure over 1–2 weeks.
Tips for Success
- Avoid Overwatering:
- Too much water can lead to rot. Keep the toilet paper damp but not soaking.
- Select the Right Cuttings:
- Hardwood cuttings are sturdier, while softwood cuttings root faster but are more delicate.
- Be Patient:
- Rooting takes time. Some cuttings may fail, but proper care improves success rates.
- Prevent Mold:
- Check for signs of mold or decay, particularly in the toilet paper or plastic bags. Replace if necessary.
Advantages of the Toilet Paper Method
- Eco-Friendly:
- Utilizes a household material, reducing waste.
- Low-Cost:
- No need for expensive propagation kits.
- Efficient Rooting:
- Maintains moisture without waterlogging, promoting healthy root development.
Conclusion
Using toilet paper to propagate roses is a simple, innovative way to grow new plants. With proper care and attention, even novice gardeners can enjoy the satisfaction of nurturing roses from cuttings. This method is budget-friendly, sustainable, and an excellent way to share the beauty of roses with others.