Building a brick walkway is a rewarding project that combines creativity, functionality, and craftsmanship. Below is an in-depth guide with detailed tips and best practices to help you achieve a professional-looking result.
Step 1: Design and Planning
1.1 Visualize and Plan
- Path Purpose: Decide if the walkway will primarily serve as a decorative garden feature or as a functional pathway.
- Width and Accessibility:
- Standard garden paths: 2-3 feet wide.
- Heavier traffic areas: 4 feet wide or more.
- Shape Options:
- Straight: Easier to construct and formal.
- Curved: Adds visual interest but requires more planning.
1.2 Choosing Bricks
- Material Options:
- Clay Bricks: Timeless and versatile; ideal for traditional gardens.
- Concrete Bricks: Durable and available in various textures and colors.
- Reclaimed Bricks: Sustainable with a vintage appeal; ensure they are sturdy and crack-free.
- Pattern Selection:
- Running Bond: Bricks are staggered for a simple, linear look.
- Herringbone: Diagonal arrangement; ideal for strength and aesthetics.
- Basketweave: Alternating pairs of horizontal and vertical bricks; best for rectangular areas.
1.3 Materials and Tools Checklist
- Bricks (calculate based on walkway dimensions).
- Crushed gravel or stone.
- Sand (builder’s or leveling sand).
- Edging material (metal, plastic, or wood).
- Stakes, string, and a line level.
- Rubber mallet and tamper.
- Masonry saw or brick chisel and hammer.
- Broom and watering can.
Step 2: Site Preparation
2.1 Marking the Walkway
- Use stakes and string to outline the path. For curves, use a garden hose or spray paint for accuracy.
- Measure to ensure consistent width and proper alignment with garden elements.
2.2 Excavation
- Depth: Dig down 7–8 inches (4 inches for gravel base, 2 inches for sand, and brick thickness).
- Remove Debris: Clear roots, rocks, and vegetation for a smooth base.
2.3 Base Preparation
- Crushed Stone Layer: Spread a 4-inch layer of crushed stone or gravel evenly across the path.
- Compact the Base: Use a hand tamper or plate compactor to create a stable, solid foundation.
Step 3: Installing the Walkway
3.1 Edging Installation
- Install edging material along the sides to keep the bricks in place. Secure firmly with stakes or anchors.
3.2 Adding a Sand Bed
- Spread a 2-inch layer of builder’s sand over the gravel base.
- Level the sand using a screed board (a flat piece of wood or metal). Ensure the surface is smooth and even.
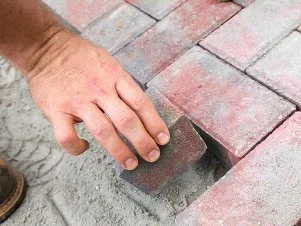
3.3 Laying the Bricks
- Start Placement: Begin at a corner or the edge, depending on your pattern.
- Brick Spacing: Keep bricks snug to minimize movement and gaps.
- Tapping Bricks: Use a rubber mallet to set bricks firmly into the sand.
- Level Check: Use a spirit level frequently to maintain uniformity.
3.4 Cutting Bricks
- For edges or curves, cut bricks to size using a masonry saw for precision or a brick chisel for smaller adjustments.
Step 4: Finishing and Securing
4.1 Filling the Joints
- Spread fine sand (or polymeric sand) over the walkway.
- Sweep sand into the joints, ensuring gaps are completely filled.
4.2 Compact the Walkway
- Use a hand tamper or plate compactor to settle the bricks and sand. This step locks the bricks into place and stabilizes the walkway.
4.3 Final Cleanup
- Sweep off excess sand.
- Rinse the walkway with a gentle spray of water to settle the sand and reveal the brick’s natural finish.
Step 5: Maintenance
5.1 Routine Inspections
- Check for uneven bricks or gaps. Adjust or add sand as necessary.
5.2 Preventing Weeds
- Apply polymeric sand during construction for weed prevention.
- Remove weeds promptly to prevent root growth.
5.3 Seasonal Care
- In colder climates, avoid using salt for de-icing, as it can erode bricks. Use sand or kitty litter for traction.
5.4 Re-sanding
- Replenish sand in the joints every 1–2 years to maintain structural integrity.
Advanced Tips for a Polished Look
- Curved Path Precision: For curved designs, use smaller brick pieces for a cleaner fit along the edges.
- Enhance Durability: Add a layer of landscape fabric beneath the gravel base to prevent weeds and settling.
- Sealing Bricks: Apply a brick sealant to enhance color and protect against moisture damage.
- Lighting: Install low-profile solar or LED lights along the walkway for an elegant, functional touch.
Conclusion
A brick walkway is more than just a practical addition—it’s a personal statement of style and care in your garden. By investing time in thoughtful planning and quality construction, you’ll create a durable, visually appealing path that enhances your outdoor space for years to come. Enjoy the journey of crafting your walkway, and take pride in the timeless charm it brings to your garden!