For centuries, wattle weaving has been a hallmark of practical and artistic craftsmanship. This ancient technique, which involves interlacing flexible branches to form sturdy structures, offers an eco-friendly, durable, and visually appealing option for creating raised garden beds. Whether you’re a seasoned gardener or a DIY enthusiast, building a wattle raised bed is an excellent way to enhance your backyard while staying environmentally conscious.
In this detailed guide, we’ll walk you through every step of creating your very own wattle raised garden bed, from planning and material selection to planting and maintenance.
What is a Wattle Raised Garden Bed?
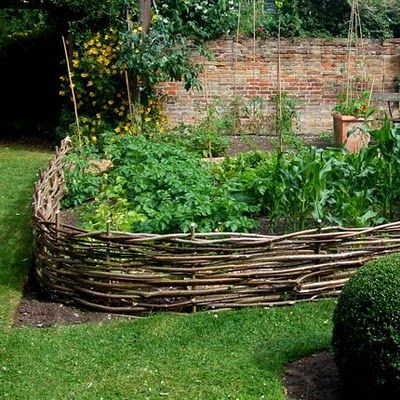
A wattle garden bed is a raised structure made by weaving pliable branches (commonly willow or hazel) between upright stakes. The result is a rustic yet robust barrier that holds soil in place while allowing for excellent drainage and aeration.
These beds are ideal for growing flowers, vegetables, or herbs and can be customized to fit any garden size or shape. Their biodegradable nature also makes them an excellent choice for eco-conscious gardeners.
Why Choose a Wattle Raised Bed?
- Sustainability: Made from natural, renewable materials.
- Cost-Effective: Requires minimal investment, especially if you have access to suitable branches.
- Aesthetic Appeal: Adds a rustic, timeless charm to your garden.
- Functionality: Prevents soil erosion, improves drainage, and creates a dedicated growing space.
- Customization: Can be built in various shapes and sizes to suit your garden’s layout.
Materials Needed
Before you start, gather the following items:
- Flexible branches or twigs: Willow, hazel, or similar pliable wood is ideal.
- Sturdy stakes: Approximately 2 feet taller than the desired height of your bed. These can be made from oak, bamboo, or any durable wood.
- Hammer or mallet: For driving stakes into the ground.
- Pruning shears: For cutting and trimming branches.
- Garden gloves: To protect your hands while weaving.
- Measuring tape and string or chalk: To mark the dimensions of your bed.
- Soil and compost mix: For filling the completed bed.
Step-by-Step Instructions for Building Your Wattle Raised Garden Bed
1. Plan and Design
- Choose a Location: Select a spot with sufficient sunlight (6–8 hours per day for most vegetables).
- Determine the Size and Shape: Decide on the dimensions of your bed. Rectangles and circles are popular, but irregular shapes can add character.
- Sketch Your Design: Draw a rough plan of the bed, noting dimensions and layout. Use string or chalk to mark the area.
2. Prepare the Site
- Clear the area of weeds, grass, and debris.
- Level the ground to create a stable base for the bed.
- Use the string or chalk lines as a guide to mark the perimeter.
3. Gather and Prepare Materials
- Branches: Collect long, flexible branches or twigs. Trim them to uniform lengths slightly longer than the circumference of your bed.
- Stakes: Cut stakes to the desired height plus an additional 2 feet for anchoring into the ground.
4. Install the Stakes
- Spacing: Place stakes approximately 12 inches apart around the marked perimeter.
- Height: Leave about 2 feet of each stake exposed above ground.
- Secure: Drive stakes into the ground using a hammer or mallet, ensuring they are upright and evenly spaced.
5. Weave the Wattle
- Start at a Corner: Begin weaving branches horizontally between the stakes.
- Weaving Technique: Alternate the side each branch starts on to create a strong interlocking structure.
- Adjust as Needed: Bend the branches gently to prevent cracking and ensure a snug fit.
- Trim Excess: Use pruning shears to cut off any overhanging branch ends for a clean finish.
6. Build Up the Walls
- Continue adding layers of woven branches until the desired height is reached.
- Tap down each layer with a mallet to compact the weave and improve stability.
- For taller beds, consider reinforcing the stakes with additional supports.
7. Secure the Top Layer
- Tuck the ends of the final layer of branches securely into the weave.
- Optionally, add a rigid wooden border or a decorative edge for a polished look.
8. Fill the Bed with Soil
- Mix nutrient-rich garden soil with compost to create an ideal growing medium.
- Fill the bed, leaving 1–2 inches of space at the top to prevent spillage.
9. Plant Your Garden
- Choose plants suited to the bed’s size and sunlight exposure.
- Follow planting guidelines for spacing and depth based on the specific plants.
Caring for Your Wattle Raised Garden Bed
- Watering: Keep the soil moist but avoid waterlogging.
- Mulching: Apply mulch to retain moisture and suppress weeds.
- Inspect and Repair: Regularly check the wattle for signs of wear and replace any damaged branches.
- Prune Surroundings: If the surrounding area has trees, ensure their branches don’t overshadow your bed.
Tips for Long-Lasting Wattles
- Use Fresh Wood: Green, freshly cut branches are easier to work with and last longer.
- Prevent Rot: Treat the stakes with a natural wood preservative if available.
- Maintain Height: If needed, add more layers of woven branches over time to maintain the structure’s height.
Final Thoughts
A wattle raised garden bed is more than just a functional gardening feature; it’s a piece of living art. By combining sustainability, practicality, and rustic charm, this project offers a rewarding way to elevate your gardening experience. While the process requires patience and effort, the result is a beautiful, durable, and eco-friendly addition to your garden that will stand the test of time with proper care.
So gather your materials, embrace the ancient art of wattle weaving, and create a garden masterpiece today!