Walnut trees are celebrated not only for their delicious, nutrient-rich nuts but also for their valuable and elegant wood. Whether you’re interested in harvesting your own walnuts in the future or simply want to grow a stunning tree for your garden or landscape, propagating walnut trees from seeds can be a fulfilling and eco-conscious endeavor. Growing a walnut tree from seed takes time, patience, and proper care, but the results are well worth it. This step-by-step guide will walk you through the process of germinating and growing a healthy walnut tree from seed.
Step 1: Assemble Your Supplies
Before you start, gather the following materials to ensure you have everything needed for a successful walnut tree propagation:
- Walnut seeds (these can be collected from mature walnuts or purchased from a reputable source)
- A pot or container for planting
- High-quality potting soil (well-draining soil is essential for healthy growth)
- Plastic wrap or a plastic bag (for the cold stratification method)
- A sunny location or grow light (walnut trees require lots of sunlight for strong growth)
- Watering can or a spray bottle (for proper moisture control)
- Pruning shears (for later stages of growth)
Step 2: Seed Selection
Choosing the right seeds is the first step to success. Make sure you select mature, healthy walnut seeds. Whether you collect them from the wild, purchase them from a supplier, or harvest them from your own tree, ensure the seeds are:
- Fully developed, plump, and firm.
- Free from mold or damage.
- Stored in a cool, dry place until you’re ready to plant them.
If you’re collecting seeds from a mature walnut tree, pick those that have naturally fallen to the ground and show no signs of disease or rot.
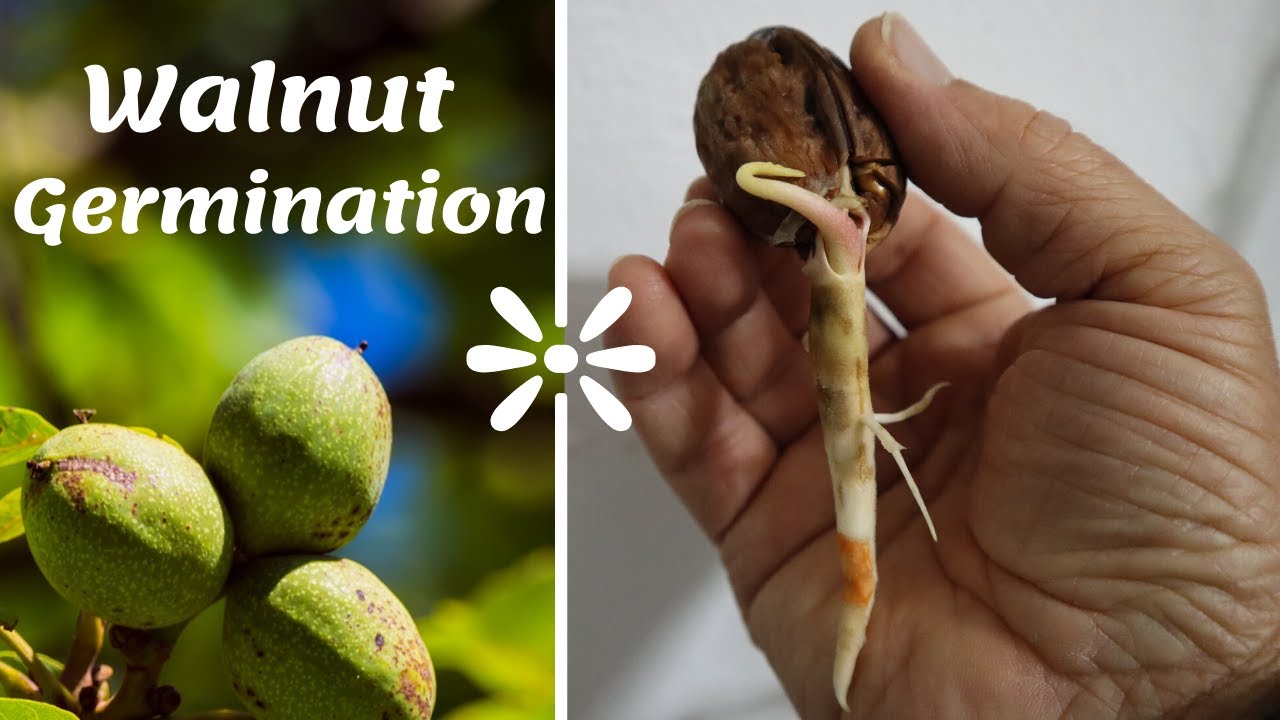
Step 3: Germination Methods
There are several techniques for germinating walnut seeds. Each method has its advantages, depending on your growing conditions and timeframe. Here are three common approaches:
Method 1: Cold Stratification
Cold stratification is a technique used to mimic winter conditions and help break the seed’s dormancy.
- Prepare the container: Fill a container with potting soil, leaving an inch of space at the top for watering.
- Plant the seed: Place the walnut seed about 1 inch deep into the soil.
- Moisturize: Water the soil so that it’s damp, but not soggy.
- Cover: Cover the container with plastic wrap or place it inside a plastic bag to create a mini-greenhouse effect.
- Refrigerate: Store the container in the refrigerator for 8 to 12 weeks. This mimics the natural cold conditions the seed would experience in the wild.
- After stratification: After the cold period, move the container to a warm, sunny spot or use a grow light to encourage germination. The seed should sprout within a few weeks.
Method 2: Soak and Plant
Soaking the walnut seed helps to soften the hard outer shell, speeding up the germination process.
- Soak the seed: Place the walnut seed in a bowl of water for 24 to 48 hours.
- Plant the seed: After soaking, plant the walnut seed about 1 inch deep in a pot filled with well-draining potting soil.
- Water: Keep the soil moist but not soggy.
- Sunlight: Place the pot in a sunny location or under a grow light to promote germination. The seed should sprout within a few weeks.
Method 3: Fall Planting
If you’re planting outdoors, fall planting is an excellent way to let nature do much of the work for you.
- Prepare the soil: Choose a sunny location with well-draining soil.
- Plant the seed: In the fall, plant the walnut seed directly in the ground about 2 inches deep.
- Cover: Cover the seed with soil and mark the spot, so you don’t forget where it’s planted.
- Wait for spring: The seed will naturally undergo the cold stratification process during the winter and begin to sprout in the spring.
Step 4: Care and Maintenance
Once your walnut seed begins to sprout, it’s time to give it the attention it needs to grow into a strong and healthy tree.
- Moisture: Keep the soil consistently damp but avoid over-watering. Walnut trees dislike waterlogged soil.
- Light: Ensure your walnut seedlings get 6 to 8 hours of direct sunlight daily. If growing indoors, a grow light can help supplement natural light.
- Transplanting: When the seedlings reach about 4 to 6 inches tall, transplant them into a larger pot or, if you’re growing outdoors, directly into the ground.
- Protection: Young walnut trees can be vulnerable to pests and animals. Consider using fencing or netting to protect them.
- Pruning: As the tree matures, prune any dead or diseased branches to encourage healthy growth. Use pruning shears to trim the tree’s canopy as needed.
- Fertilizing: Apply a balanced, slow-release fertilizer to ensure the tree receives the essential nutrients it needs to grow strong and healthy.
Step 5: Transplanting Outdoors
When your walnut tree reaches 2 to 3 years old and has grown to about 3 to 4 feet tall, it’s time to transplant it to its permanent location. Here’s how:
- Choose a location: Select a sunny spot with well-draining soil. Walnut trees need plenty of space to grow, so avoid planting them near structures, other trees, or large plants.
- Dig the hole: Dig a hole that is twice as wide as the root ball and of similar depth.
- Remove the tree: Gently remove the tree from its container, being careful not to disturb the roots too much.
- Plant the tree: Place the tree in the hole, ensuring the top of the root ball is level with the ground’s surface.
- Backfill the hole: Fill in the hole with soil, gently tamping it down as you go to eliminate air pockets.
- Water: Water the tree thoroughly after planting to settle the soil and promote healthy root development.
Conclusion
Growing a walnut tree from seed is a rewarding and sustainable process that can provide a lifetime of benefits, from shade to delicious nuts to beautiful wood. By following the guidelines above and selecting the germination method that best suits your needs, you’ll be on your way to nurturing a walnut tree that can thrive for generations.
Patience is key when growing walnut trees from seed, as they take several years to mature. But with consistent care, you’ll soon have a beautiful tree that adds value to your garden and provides both practical and aesthetic benefits for years to come. Happy planting!