If you’ve ever dreamed of hatching your own eggs but were deterred by the cost of professional incubators, you’re in luck. With a little creativity, you can build a simple, cost-effective egg incubator using materials you likely already have around the house, such as a plastic water bottle. This DIY project is perfect for beginners, offering an excellent introduction to the art of incubation, and is especially useful for small-scale egg hatching (like raising chickens, ducks, or quails). Not only is this a fun and educational endeavor, but it’s also an environmentally friendly, budget-conscious solution that’s easy to make and operate.
In this guide, we’ll walk you through the process of constructing a homemade incubator from a 5-liter plastic water bottle, explain the importance of temperature and humidity control, and provide tips for successful egg hatching. Let’s dive in!
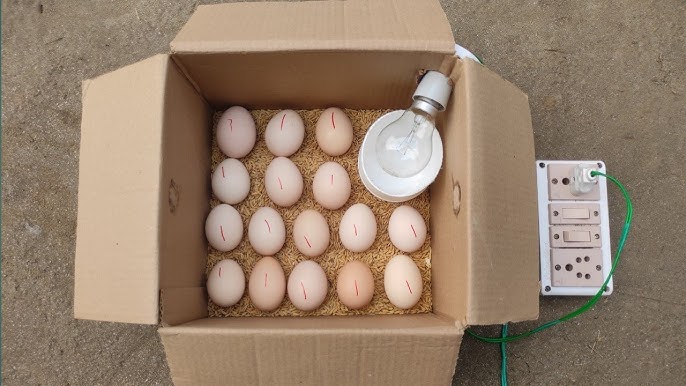
Materials Needed:
- 5-liter Plastic Water Bottle (or larger, depending on the number of eggs you plan to hatch)
- Small Light Bulbs or Heat Lamps (to regulate temperature)
- Thermometer (for monitoring temperature)
- Hygrometer (to monitor humidity levels)
- Foam, Egg Carton, or Sponges (to stabilize the eggs)
- Scissors or a Drill (for cutting and making ventilation holes)
- Electrical Tape or Glue (for securing components)
- Power Source (for the light bulbs or heat lamps)
- Container of Water (for humidity control)
Step-by-Step Guide to Building the Incubator:
1. Prepare the Water Bottle:
- Clean the Bottle: The first step is to thoroughly clean your plastic water bottle. Rinse it well to remove any dust, dirt, or residues from manufacturing. If the bottle is used, make sure to scrub it to prevent any contamination that could harm the eggs.
- Cut the Bottle: Lay the bottle on its side and carefully cut a large opening on the narrower side of the bottle. This will act as the door for your incubator, allowing easy access to the eggs. Be cautious when cutting; you want a clean, smooth edge so that you don’t accidentally damage the incubator structure.
2. Setting Up the Heat Source:
- Install Light Bulbs or Heat Lamps: You’ll need a heat source to maintain the ideal temperature inside your incubator, which is around 99.5°F (37.5°C) for most bird eggs. Small incandescent bulbs work well for this purpose. Depending on the size of the water bottle and the number of eggs, you may need more than one bulb. You can also use small heat lamps if available.
- Mount the Heat Source: Use the top or sides of the bottle to mount the bulbs or heat lamps. Be sure they are securely attached and that they don’t pose any risk of falling inside the incubator or touching the eggs. Ensure that the light bulbs are positioned to provide even, consistent heat throughout the incubator.
- Temperature Control: The primary concern when incubating eggs is maintaining a consistent temperature. Install a thermometer inside the incubator and regularly check the temperature to ensure it stays at the optimal range (99-100°F or 37.2-37.7°C). If the temperature is too high or too low, you may need to adjust the number of bulbs or move them further away from the eggs.
3. Stabilizing the Eggs:
- Foam, Egg Carton, or Sponges: The eggs need to be stabilized inside the incubator so they don’t move around. You can use foam or an egg carton for this purpose. Cut the foam to fit the inside of the bottle and make indentations where the eggs can sit. If you’re using an egg carton, cut it into pieces that fit inside the bottle, ensuring that each egg has enough space and is held at a slight angle of about 45 degrees.
- Prevent Rolling: By stabilizing the eggs, you help prevent them from rolling around and ensure they are in the correct position for developing embryos. This helps with heat distribution and prevents any undue stress on the developing eggs.
4. Install the Thermometer and Hygrometer:
- Temperature and Humidity Monitoring: It’s crucial to maintain the right conditions inside your incubator for successful egg hatching. Eggs require a steady temperature, as well as the correct level of humidity. Use a thermometer and hygrometer to keep track of these factors.
- Humidity Control: To maintain the right humidity, you can place a small container of water inside the incubator or spray water onto a sponge. The humidity should stay around 45-55% during the first 18 days of incubation, and then increase to 65-75% during the final three days before hatching. This increase in humidity helps soften the eggshell and makes it easier for the chicks to break out.
5. Ventilation for Fresh Air:
- Drill Small Holes: Proper ventilation is essential for egg development. Drill small holes into the top, bottom, or sides of the water bottle to allow air to circulate. This ensures that the developing embryos get enough oxygen and that excess heat or moisture can escape.
- Balance Ventilation and Humidity: While ventilation is necessary, make sure you don’t overdo it. Too much airflow could dry out the eggs, especially during the first stages of incubation. If needed, cover some of the holes with tape or other materials to maintain the right balance.
6. Manual Egg Turning:
- Turn the Eggs Regularly: Egg turning is critical for ensuring even development of the embryos. The best practice is to turn the eggs at least three times a day. This prevents the yolk from sticking to the eggshell and ensures even heat distribution. You can gently rotate the eggs by hand, ensuring they are turned 180 degrees each time.
- Stop Turning Before Hatching: About three days before the eggs are expected to hatch, stop turning them. This gives the embryos a chance to position themselves correctly for hatching.
Additional Tips for Success:
- Monitor the Eggs Closely: Keep an eye on the eggs during the incubation period. If you see any that seem to have a crack or other abnormalities, isolate them to prevent any contamination.
- Adjust for Different Egg Types: If you’re incubating eggs from different species (e.g., chickens, ducks, quails), note that each type may have slightly different temperature and humidity requirements. Be sure to research the specifics for the type of eggs you’re incubating.
- Keep the Incubator Clean: Regularly clean the incubator and check for any mold or mildew growth. Dirty incubators can compromise the health of the eggs and reduce hatch rates.
Safety Considerations:
- Heat Source Safety: Be cautious when using light bulbs or heat lamps. Ensure that the light bulbs are placed in a safe position where they cannot fall into the incubator. Always check the wiring and the heat sources to ensure they’re working correctly and are not overheating.
- Power Source: Ensure that the power source for your light bulbs or heat lamps is stable and properly installed. Avoid any exposed wiring that could pose a hazard.
- Out of Reach of Children and Pets: Keep the incubator out of the reach of young children and pets. The lights can get hot, and the eggs need to be undisturbed for the best chances of hatching.
Conclusion:
Building your own egg incubator from a plastic water bottle is not only an enjoyable and educational DIY project, but it’s also a practical way to hatch eggs without breaking the bank. With careful attention to temperature, humidity, and egg turning, you can create an effective and reliable incubator that will provide you with healthy, thriving chicks. Whether you’re hatching chickens, ducks, or even quail, this homemade incubator can help you take the first step in raising your own poultry. Happy hatching!