Watering your vegetables efficiently is one of the most critical aspects of garden care. Too little water can stunt growth, while overwatering can lead to root rot and other issues. If you struggle with consistently watering your plants, or if you want to ensure your vegetables get a steady supply of water even when you’re not around, a DIY automatic vegetable waterer using a plastic bottle is an excellent solution.
This method involves creating a simple, self-regulating watering system that can provide your plants with consistent moisture directly at their roots. It’s not only cost-effective, but it also minimizes water waste and reduces the need for frequent hand-watering.
Let’s dive into the steps you need to follow to build your own automatic vegetable waterer using a bottle:
Materials Needed:
- 1 plastic bottle (a water or soda bottle works well)
- A sharp knife, pin, or small drill (to create holes)
- A shovel or hand trowel (for digging)
- Water (for filling the bottle)
- Optional: Terracotta pot (for a more eco-friendly alternative)
Steps to Create the Automatic Vegetable Waterer:
1. Choose the Right Bottle
- Select a plastic bottle that’s clean and free of labels. You’ll want a bottle that’s at least 16 ounces (but larger ones work even better, especially if you’re watering several plants at once).
- The size of the bottle you choose should depend on the needs of your vegetable plants. Larger bottles (like 2-liter soda bottles) can be used for plants that require more water, while smaller bottles are better suited for smaller vegetable beds or containers.
2. Puncture Small Holes in the Bottle
- Using a sharp knife, pin, or small drill, carefully create small holes around the sides and near the bottom of the bottle. These holes are essential for allowing the water to slowly drip out of the bottle and into the surrounding soil. The smaller the holes, the slower the water will drip out, which can be useful for more delicate plants that don’t need excessive water.
- Be mindful of the hole placement – if you put too many holes near the top, water will drain too quickly, while putting them all at the bottom may cause water to pool too quickly in the soil, potentially causing root rot. Aim for a few holes evenly spaced around the bottle.
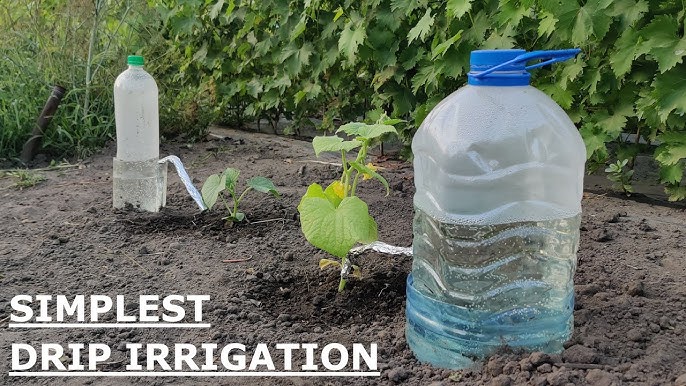
3. Bury the Bottle Near Your Vegetable Plants
- Dig a small hole in the soil near your plants. The hole should be deep enough to accommodate the entire bottle with the neck slightly above the soil surface.
- Bury the bottle vertically with the neck sticking out just a little. This ensures that the water will seep out gradually, and that the bottle remains stable in the ground. Be sure to bury the bottle close to the root zone but not too close to avoid disturbing the roots. The closer the bottle is to the roots, the more direct the watering will be.
4. Fill the Bottle with Water
- Once the bottle is securely in place, fill it with water. As the water seeps through the holes, it will gradually moisten the soil around the roots of your plants. The moisture will spread downward and outward from the bottle, providing a consistent water source for your plants.
- Keep the bottle topped up with water as it empties. You may need to check the water level periodically, depending on how much water the soil around your plants needs.
5. Observe and Adjust the Water Flow
- Depending on the soil type and weather conditions, you may need to adjust the size of the holes or the amount of water used in the bottle. If you notice the soil around the bottle is too dry, consider increasing the number of holes. If the soil is too wet, reduce the number of holes or use a smaller bottle.
- This method can be particularly useful for maintaining a consistent moisture level without overwatering. Plants can be watered while you’re away for a short period, making it a great system for vacations or busy schedules.
Additional Tips for Using Your Automatic Waterer:
1. Combine with Mulching
- Mulching around the base of the plant can help retain the moisture that is being slowly released by the bottle. It will also prevent soil evaporation, reduce weed growth, and help maintain a more consistent temperature around the plant roots.
- Organic mulches like straw, wood chips, or shredded leaves work well with this watering system and can significantly reduce the amount of water your plants need.
2. Experiment with Different Bottle Sizes
- For larger vegetable beds or gardens with multiple plants, you can use multiple bottles, or even larger containers like milk jugs or 2-liter soda bottles. Larger containers will last longer without needing to be refilled and can help water more plants at once.
- For container gardening, smaller bottles (16 oz or less) can be used to avoid waterlogging the plants.
3. Use This System for Consistent, Deep Watering
- The beauty of this method is that it encourages deep watering at the root level. This is especially beneficial for plants like tomatoes, cucumbers, and peppers that have deep roots and need consistent moisture to thrive. By providing water directly to the roots, you reduce the risk of overwatering the foliage or causing mold and mildew problems.
4. Eco-Friendly Alternatives: Terracotta Watering Pots
- For a more sustainable and natural option, consider using a terracotta pot instead of a plastic bottle. Terracotta pots are naturally porous, allowing water to seep out slowly into the soil. Simply bury the pot up to the rim, leaving the opening exposed, and fill it with water. Over time, the water will gradually leak out, providing consistent moisture to your plants.
- This method is especially useful for plants that prefer slightly drier conditions, as the porous material allows water to escape more slowly and evenly.
Why This Method Works:
The automatic watering system using a plastic bottle is an effective, low-maintenance solution for keeping your plants consistently hydrated. By delivering water directly to the roots, this method minimizes water waste and ensures that your vegetables receive adequate moisture without overwatering or wetting the leaves.
The slow, steady release of water from the bottle allows for deep watering, encouraging strong root development and healthier plants. This is particularly important during the critical growing stages of vegetables like cucumbers, tomatoes, and peppers.
Additionally, the simplicity and low cost of this system make it an excellent choice for both beginner and experienced gardeners alike.
In Conclusion:
Creating your own automatic vegetable waterer with a plastic bottle is a simple and effective way to ensure your plants stay well-hydrated, even during hot weather or while you’re away. This DIY project can help improve plant health, reduce water waste, and save time, making it a great gardening hack for any vegetable garden. Try it out, and watch your vegetables thrive with steady, consistent watering!