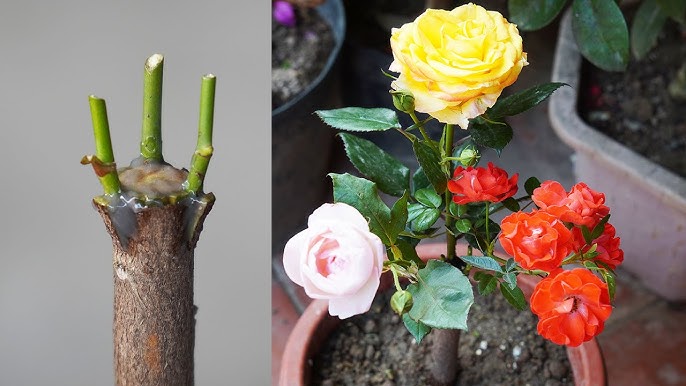
Creating a rose bush with multiple flower colors is a dream for many gardeners. Through the process of grafting, you can achieve this stunning effect by joining stems of different rose varieties onto a single healthy rootstock. This detailed guide covers everything you need to know to successfully graft roses, from timing and preparation to aftercare.
Why Graft Roses?
- Aesthetic Appeal: Combine different colors or even varieties of roses on one bush for a show-stopping display.
- Preservation: Use a hardy rootstock to rescue a rare or weaker rose variety.
- Efficiency: Instead of maintaining multiple plants, you can grow several varieties in one location.
The process involves grafting a scion (the stem of the desired rose) onto a rootstock (the healthy base plant). A successful graft results in the scion adopting the rootstock’s robust characteristics while maintaining its own blooms.
When to Graft Roses
- Ideal Season:
- Summer is best because the sap flow is at its peak, promoting faster healing and integration of the scion and rootstock.
- Plant Condition:
- Choose a time when your roses are actively growing and appear fresh, with no signs of stress or disease.
What You’ll Need
- A sharp knife or utility blade (preferably sterilized).
- Cleaning alcohol or disinfectant.
- Adhesive tape or grafting tape.
- Healthy rootstock plant.
- Scion (stem from the rose variety you want to graft).
Step-by-Step Grafting Instructions
1. Clean Your Tools
- Use rubbing alcohol or a sterilizing solution to clean the knife or blade.
- Prevents the transfer of diseases or pathogens between plants.
- Pro Tip: Clean the blade between cuts, especially if working with multiple plants.
2. Collect Scions
- Select a healthy stem from the rose bush you want to graft.
- How to Cut the Scion:
- Find a stem with at least three buds.
- Make a clean cut just above the top bud and another below the third bud.
- Discard excess leaves to focus the plant’s energy on rooting and growth.
- Pro Tip: Store scions in a damp paper towel if you can’t graft immediately to keep them hydrated.
3. Shape the Scion for Grafting
- Use a sharp knife to carve the bottom of the scion into a “V” shape.
- Ensure the cuts are smooth and even for maximum contact with the rootstock.
4. Prepare the Rootstock
- Choose a woody, mature stem from the rootstock plant (avoid soft, new growth).
- Cut off the top of the stem to create a flat surface.
- Make a vertical slit about 1 cm deep in the center of the rootstock’s trimmed stem.
- Pro Tip: Ensure the rootstock is well-watered before grafting to improve sap flow.
5. Insert the Scion into the Rootstock
- Slide the “V”-shaped base of the scion into the slit on the rootstock.
- Ensure that the cambium layers (the green, growing tissues just beneath the bark) of the scion and rootstock align. This is crucial for successful grafting.
- Wrap the graft securely with adhesive or grafting tape to hold it in place.
6. Allow the Graft to Heal
- The graft will take 4–6 weeks to heal and settle. During this period:
- Keep the plant in a location with indirect sunlight to avoid stress.
- Water regularly to maintain soil moisture.
Post-Grafting Care
Once the graft is complete, your job isn’t done. Follow these care tips to ensure the graft thrives:
- Watering:
- Keep the soil consistently moist, especially for the first 15 days.
- Pruning:
- Remove any new shoots from the rootstock to redirect energy to the grafted scion.
- Prune the first 2–4 shoots from the graft to encourage stronger growth.
- Fertilization:
- Feed the plant with organic compost or a balanced fertilizer to promote robust development.
- Sunlight and Space:
- Place the plant in an area with good airflow and plenty of sunlight (6–8 hours daily).
- Remove the Tape:
- Allow the adhesive tape to naturally loosen and fall off as the graft stabilizes.
Additional Tips for Success
- Choose Compatible Varieties: Ensure the scion and rootstock are of compatible rose species for better grafting success.
- Avoid Overwatering: While moisture is essential, soggy soil can lead to root rot. Use well-draining soil to prevent this.
- Monitor for Pests: Keep an eye out for pests or diseases that could compromise the graft. Use neem oil or natural repellents as needed.
- Label Your Grafts: If using multiple scions, label them to track which varieties are grafted.
Why This Technique is Worth Trying
Grafting roses is not only a practical way to combine the beauty and strength of different rose varieties but also a creative gardening experiment. Imagine the joy of a single bush producing multiple colors of roses—each bloom a testament to your skills and care.
With the right preparation, attention to detail, and proper aftercare, you’ll soon have a rose bush that’s as unique as your garden vision. Start grafting today and let your creativity bloom!