In the sprawling expanse of urban landscapes, where green spaces are a luxury, wicking beds emerge as a sustainable solution for gardening. This innovative, self-watering system not only conserves water but also empowers city dwellers to transform limited spaces into thriving, productive gardens. By building a wicking bed, you can create a green oasis that supports healthy plants, reduces water usage, and promotes sustainable urban living.
What is a Wicking Bed?
A wicking bed is a highly efficient, self-watering raised garden bed. It works on the principle of capillary action—where water is drawn upward from a reservoir beneath the soil to hydrate plant roots. This design mimics natural groundwater systems and minimizes water loss through evaporation, making it an ideal solution for areas prone to drought or where water conservation is critical.
The system often features an ‘L’-shaped pipe, which distributes water evenly across the reservoir’s length and provides a convenient fill point above the soil. By maintaining consistent moisture levels, wicking beds reduce the need for frequent watering and create an optimal environment for healthy plant growth.
Why Choose a Wicking Bed?
- Water Efficiency: Reduces water wastage by ensuring water is directly available to plant roots.
- Low Maintenance: Requires less frequent watering compared to traditional gardening methods.
- Versatility: Perfect for growing a variety of plants, from vegetables and herbs to flowers, even in small urban spaces.
- Durability: When built correctly, a wicking bed can last for years, providing a reliable and productive garden system.
Step-by-Step Guide to Building a Long-Lasting Wicking Bed
Creating a wicking bed requires careful planning and attention to detail to ensure the system functions effectively and lasts over time. Here’s a comprehensive guide to help you build your own:
Step 1: Select Your Container
The first step is choosing a sturdy and durable base for your wicking bed. Options include:
- A custom wooden frame treated for outdoor use.
- Repurposed items like an old bathtub, metal trough, or large plastic bin.
- Commercially available raised garden bed kits.
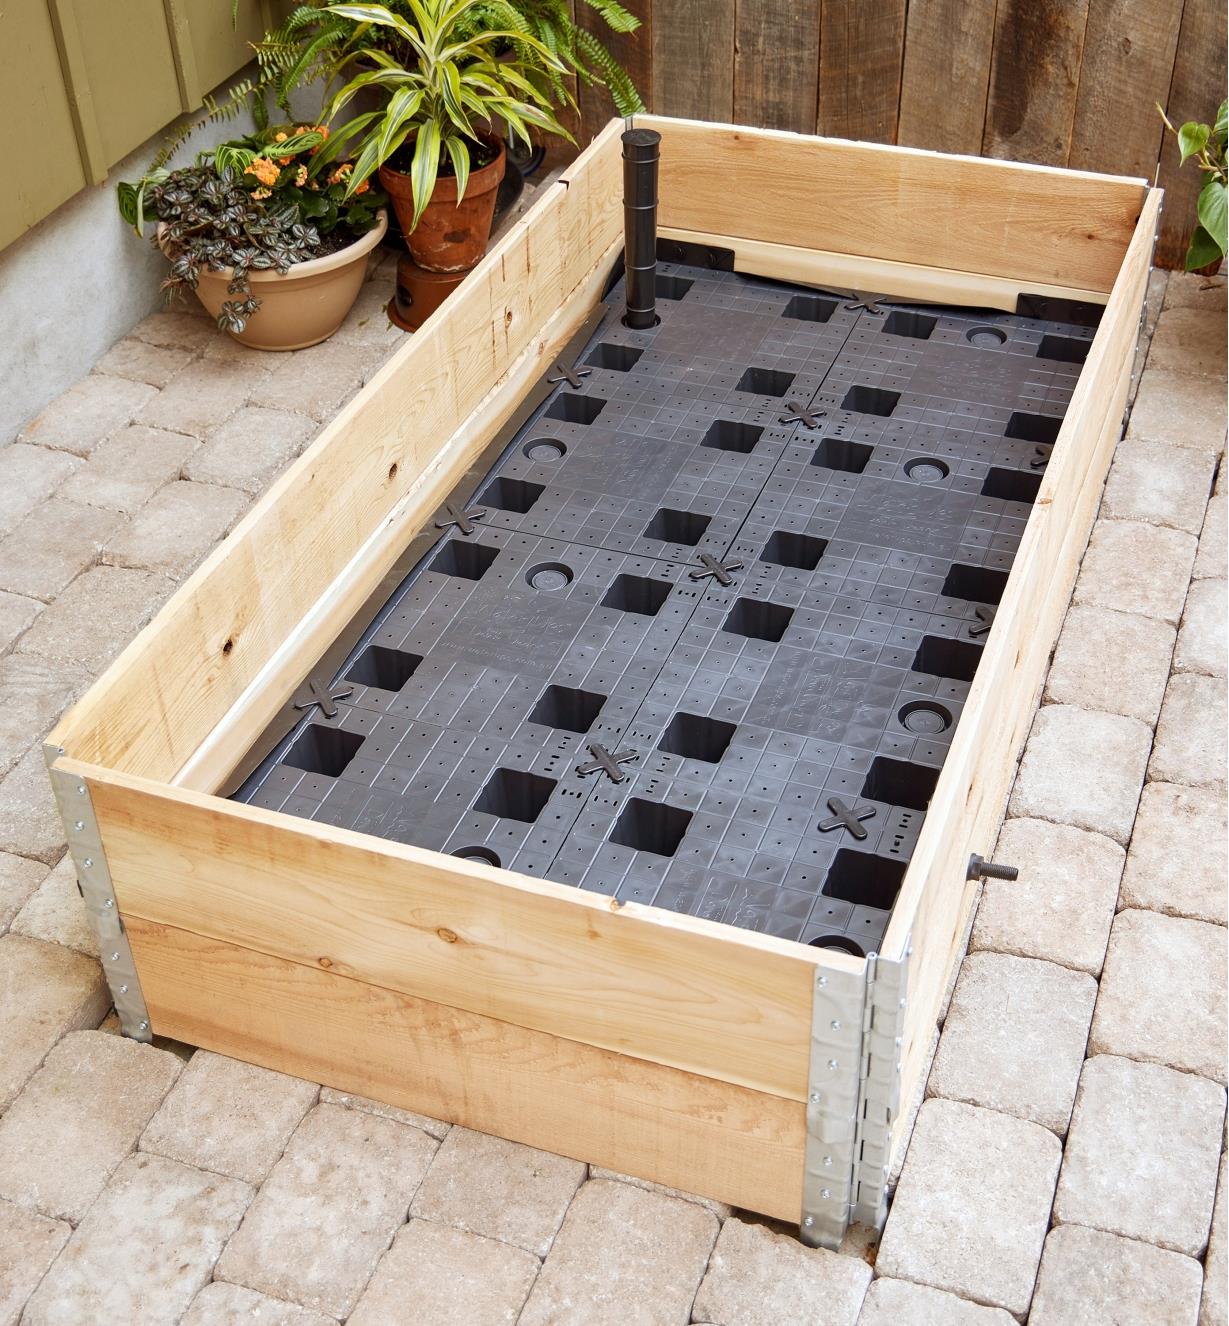
Tip: Ensure the container is deep enough to accommodate both the water reservoir (about 4–6 inches) and a significant layer of soil (10–12 inches).
Step 2: Waterproof the Reservoir
Line the bottom of the container with a high-quality waterproof membrane, such as pond liner or thick plastic sheeting. This creates the reservoir where water will be stored.
Important: Check for leaks by adding water before proceeding to the next step.
Step 3: Install the ‘L’-Shaped Pipe
- Use a PVC pipe to create the watering system.
- Lay the horizontal section of the pipe along the bottom of the container, with perforations or small drilled holes to allow water to flow evenly.
- At one end, bend the pipe upwards so it extends above the soil level. This vertical section serves as the fill point for adding water.
Tip: Cap the end of the horizontal pipe to prevent soil from entering.
Step 4: Add the Aggregate Layer
- Fill the bottom of the container with coarse gravel, crushed rock, or other drainage material to create the reservoir.
- Ensure the layer is level and deep enough to allow efficient water storage.
Pro Tip: To maximize water capacity, use a lightweight aggregate like expanded clay pellets.
Step 5: Place a Geotextile Barrier
Cover the aggregate layer and pipe with geotextile fabric. This material prevents soil from mixing with the reservoir while allowing water to wick upwards to the plants.
Step 6: Add Soil
Fill the container with a nutrient-rich soil mix on top of the geotextile fabric. The soil should:
- Be light and well-draining.
- Contain organic matter to support plant growth.
- Be free of large debris that could block water flow.
Step 7: Create an Overflow Outlet
Install an overflow valve or pipe at the height where the soil meets the reservoir. This ensures excess water drains away, preventing waterlogging and root rot.
Step 8: Plant and Mulch
- Plant your seeds or seedlings directly into the soil. Select plants suitable for your climate and gardening goals.
- Apply a thick layer of organic mulch, such as straw or bark chips, to reduce evaporation and maintain consistent soil temperature.
Step 9: Fill and Monitor
- Pour water into the vertical pipe until it flows out of the overflow outlet.
- Regularly monitor water levels and refill the reservoir as needed.
Maintenance Tips for Longevity
- Inspect Regularly: Check for leaks or blockages in the pipe and overflow system.
- Refresh Soil: Add compost or organic fertilizer to replenish nutrients annually.
- Prevent Algae: Keep the reservoir covered to minimize algae growth.
Benefits of Wicking Beds in Urban Gardening
- Resilience Against Drought: Efficient water use makes wicking beds a sustainable solution for dry climates.
- Optimized Space Usage: Ideal for small spaces like balconies, patios, or rooftop gardens.
- Year-Round Gardening: With proper soil and plant selection, wicking beds can support growth in all seasons.
Conclusion: A Green Revolution in the Concrete Jungle
Wicking beds are a beacon of hope for urban gardeners, offering a sustainable and efficient way to grow fresh produce and vibrant plants in limited spaces. By following this guide, you can construct a long-lasting wicking bed that turns your urban environment into a flourishing green sanctuary.
Embrace this innovative gardening method and join the movement toward resource conservation, self-sufficiency, and a greener future.